Wednesday, August 15, 2012

1 week 4 days - Yep, still flaming!

Wow! Has it been that long since I have put this set of Jams on? Yes it has! One week and four days!
And you know what? I think my acrylics are suffering more of a need to be filled than my Jams are needing to be replaced!
Left Hand - Looking good!

Right Hand - A little bit rough.
The tips on my right hand are a little damaged, but they always are on my dominant hand. I am always picking and prying at things with my nails that I know full well that I shouldn't be. And while the tips are a bit rough the shields still look pretty good, if you're asking me! They are still attached solidly, I haven't had to fully replace a single shield. I think, a couple days ago, I had to reapply glue to the tips to prevent some lifting after doing dishes most of the day!

My biggest problem at this point... I am getting bored with them! I just want to dig into my stash and find something colorful and vibrant that I can mix it up with! I am addicted! But, I am really aiming to keep these on as long as I can though. I like to show off the longevity of the shields to just about anyone who will listen! So, they'll stay on until my nails (A) fall off or (B) I have them rebased (which will probably happen on Saturday). They probably would stay on longer than that, but like I said, I am getting bored with the design! Though, I have gotten TONS of compliments on my Flames! I guess they are pretty eye catching! Especially with The Hunger Games coming out on DVD on Friday!

Oh! And my new Fall/Winter catalogs are on order! I can NOT wait until they get here! I also can't wait until I get my hands on the new application kits! I've ordered a few of them, my past hostesses and my first 3 hostesses in September will get one as a gift! So request a party today and get yours when it comes in!

Saturday, August 11, 2012

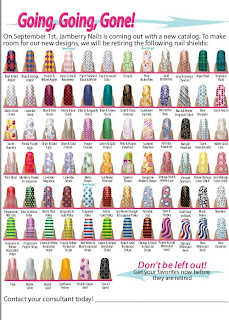
Going, going, GONE!


I am SO excited to share our new catalog with you but it wont be available until September 1st!
Until then I have the list of retiring shields that wont be available in the next catalog so if you see something you MUST have! Please go get it before they are no longer available!

You can shop for these shields and many more in my online store at www.nomorenailpolish.jamberrynails.net/home/products.aspx

Friday, August 10, 2012

Will you be my MYSTERY HOSTESS?


Join my Jamberry Mystery Hostess ONLINE Event!!


What is a Mystery Hostess Party, you say?
It's a party formed, by me, without an official hostess! Once the party is over, everyone who has earned a chance to win the rewards will be tallied up and the winner will be drawn. The person drawn will receive the Hostess Rewards just as if they had organized the party up themselves!

How do you earn chances to win, you ask?
Earn 1 chance per sheet you purchase, 4 entries for participating in the Buy 3 Get 1 FREE!
Earn 5 chances for booking a party. (In home OR Online)
Earn 10 chances for becoming a consultant! 


Participating is easy!
All you have to do is shop on my website www.nomorenailpolish.jamberrynails.net between now and August 24th, when the party closes, and you are instantly qualified for a chance to win the Hostess Rewards!
-Important- During the check out process, you MUST mark "Yes" when asked if your order is associated with a party and you MUST select Mystery Hostess from the drop down menu!
All qualified entries will be tallied, accumulated and drawn from at random on August 25th, 2012 by Midnight (MST) on video.
The winner will be contacted by e-mail to claim their reward, so have your wishlists ready!

You may also join my Facebook Event if you'd like but it is not required to win. I will be posting to the group with pictures of different designs, as well as tips and tricks!
You can find the event here: https://www.facebook.com/events/380920245308320/

Now is the perfect time to give Jams a try if you've never used them before!
Jamberry Nails are the hottest trend in nail design: a revolutionary film you apply and remove with the heat of your hair dryer to give you an affordable, durable, and stylish manicure or pedicure at home!
  • Lasts 2 weeks on fingers, 6 weeks on toes with NO chipping *Something for everyone with hundreds of designs
  • Easy to apply and remove on natural or artificial nails with no damage
  • Free of harsh chemicals and common allergens like gluten and latex
  • Vegan-friendly: no animal products or testing
  • Non-toxic and safe for children
  • Proudly manufactured in the United States
  • Each affordable sheet gives 2-4 manicure/pedicure applications and never dries out 

Here is a list of July's tp 20 to give you an idea of what is trending!

Here is the list of shields that are being dropped from our Fall/Winter catalog.

And our highly requested French Tips were recently released, get yours now!


 So join me in my ONLINE Mystery Hostess event from the comfort of your own computer!

Shop at: www.nomorenailpolish.jamberrynails.net
 Be sure, during the check out process, you mark "Yes" when asked if your order is associated with a party and you MUST select Mystery Hostess from the drop down menu!

Thursday, August 9, 2012

How do you apply your Jams?

 Jamberry Nail Shields are designed to be easily applied in a salon or at home!


Step 1: Clean nails with nail polish remover or alcohol. (Clean, oil free nails are one of the most important steps of the application)
Step 2: Cut and file nails to desired length and shape.
Step 3: Buff top of the nail and push back cuticle.
Step 4: Match nail (finger or toe) to the nail shield that best fits.
Step 5: Peel off nail shield and warm with a blow-dryer 10-15 seconds or until soft and flexible.
Step 6: When warm, press the shield onto the nail.  Apply firm pressure around edges to adhere the shield to the nail.  Use rubber cuticle pusher to seal the shield around the cuticle.
Step 7:  Trim the top with scissors and file off remaining shield using a downward motion to remove excess.
Step 8: Apply heat and pressure to the shield again until it is sealed to the nail. (Repeating this step several times helps create a tight seal to the nail surface and increases wear time)
Optional  Step 9: For active users you can add a small amount of nail glue to the free edge to better seal the nail shield. 

How to remove:
There are 2 removal options for Jamberry Nail Shields. For Nail Shields that have been worn for more than 10 days we recommend following the Gentle Removal Process. 

Quick Removal Process: Heat the shields with a blowdryer for 15 seconds. Then break the seal by getting under the edge of the shield with your opposite thumb nail. Slowly peel the shield from side to side. If the Nail Shields are not peeling easily or the adhesive is still bonded to the nail bed then follow the Gentle Removal Process.

Gentle Removal Process: Soak the Nail Shields in nail polish remover for 20-30 seconds and gently rub them off. Soaking will break down the adhesive bond and allow them to easily slide of the nail bed. 

Some other helpful tips:
  • You will receive instructions with your purchase and if you have any trouble at all with the application I am always just a phone call away!
  • You DO NOT need a base or top coat! But you are free to use either if you feel they are necessary!
  • You DO NOT need to be certified to apply these. Jamberry Nails can be applied without a profession stylist or beauty degree!
  • NO residue or nail damage will occur from wearing them.
  • Please remember to follow the instructions for proper removal! Personally, I prefer to soak mine in polish remover for about 30 seconds and rub them off rather than heat and gently pull.
  • You can easily trim the shields with cuticle scissors if you feel your nail is too narrow for the pre-cut strips.
  • You can swim withthem on!

Wednesday, August 8, 2012

Still on fire!

So, today's post is all about how my Flame Jams are hanging on.

I applied them on Saturday over a new set of acrylics. Did my toes too... see!

Oh how I love those flames! And several people have commented on them! They aren't as eye-catching as some of my color combinations but they are fun and look so good in person!

So, this is what they loo like today, 4 days later...
Left Hand
Right Hand

 You see that one, yes that one, my right thumb! The Jamberry tore! But this is no fault of Jamberry mind you! I was moving heavy plastic containers around yesterday and I actually got my thumbnail caught between a lid and container when I went to put it down and walk away from it. It actually got jammed in there pretty good and when I pulled away the corner tore off! The rest of the shield stayed solid, just the corner tore where it looked like it had been perforated by the plastic container and its lid.

The point here is to show you how fast I was able to fix it and get it looking good again!
  • I didn't have to make a costly appointment at a salon to have a touch up or a fingernail repainted (even if it only costs a couple dollars to repair at the rate I have been known to damage my polish I would end up paying for a complete re-polish if I were going to a salon!).
  • I didn't have to pull out the stinky old nail polish and re-polish the whole nail myself. Which had I been using polish I would have HAD to do. I NEVER get polish fixes to look right when I just try to clean up a damaged area, I ALWAYS have to take ALL the polish off my nail and re-polish, which then takes time to dry that I don't have!!
  • And I didn't have to sit here with a crappy looking corner that just begs me to chew on it!
True, I could have soaked or heated (I prefer soaking on my natural nails and heating on my acrylics) and removed the whole shield and then reapplied the whole shield. But why bother!?

I had some scraps laying around from having done my toes (ladies, please tell me you ALWAYS keep your scraps). So, I scrapped the corner of the nail a few times with a file to rough it up, then I cleaned up my nail with an alcohol pad (the MOST important step, IMHO, even if just doing a repair)! and I heated up a scrap that I thought would fit. Once heated (about 10 seconds later) I applied it to my nail and attempted to line it up with some of the other flames so as not to be so noticeable. The flames lined up almost perfectly, I trimmed off the excess and heated it again for another 15 seconds. After shutting off my hair dryer I used my rubber cuticle pusher to apply pressure to the area I had just fixed for a few seconds, making sure I pressed the warm adhesive solidly onto my nail. Lastly I sealed the edge of the corner with nail glue (I do this with all my nails at the free edge to seal them) ,  buffed away any rough spots, and voila! Repaired!


Sure, up close you can really tell the corner isn't quite right. But from further away...


Yeah, I think it looks pretty good! I am happy with it and I don't feel like I need to take that shield off and replace it. And best of all, it took me less than 5 minutes from start to finish. Okay, okay, maybe it took me all of 5 minutes including the time I took me to get my shields out, get my hair dryer, get it plugged in, and get my nail kit out (I always keep my nail kit handy in my Jamberry party box).

Quick and easy!
And, ZERO drying time!

Join me back here tomorrow and I'll give you some short instructions on how to quickly apply a new set of Jams!

Tuesday, August 7, 2012

Join my Jamberry Team!


Join Jamberry Nails, It's Easy!


Joining Jamberry Nails gives you a fun and flexible way to earn extra income selling one of the hottest new products. If you've already been wearing Jamberry Nails, you know they are extremely contagious. They're easy to sell and a breeze to apply. By simply enjoying your nail shields you'll be doing your own marketing. You'll find people naturally interested in purchasing the nail shields for themselves.

Jamberry Nails began with a simple idea of helping women everywhere find a new way to express themselves. After arranging for babysitters and spending an overly expensive afternoon at the salon, the founding sisters decided there had to be an easier, more cost effective and longer‐lasting way to accessorize their nails.

Jamberry Nails grew into the easiest way to get noticed and complimented all day long. Becoming a direct selling party company was a natural step to share the success with others, and Jamberry Consultants have continued that mission.

My first application of Jamberry Nail Shields was Chalkboard Hearts for my son's graduation this year and I got SO many compliments! Everywhere I went I was asked where I got m nails done! Best of all they were affordable, easy to apply, and made me feel great about myself!

Jamberry Nails Shields are easy to sell. You wear them, and people want them!

They are extremely addictive! So  many choices can easily overwhelm people so I always tell them to make use of the current Buy 3 get 1 FREE special and buy styles that mix well and you can always have a unique, colorful, and eye catching manicure!

The Independent Consultant Compensation plan is one of the best in the industry! You can view the video below to learn more about the compensation plan!


Start your business for just $99(USD) plus shipping and handling. Jamberry Nails will send you a starter kit with all the materials needed to run your own Jamberry Nails business.

The starter kit contains the following:
50 Catalogs
50 Brochures
100 order forms
Rubber Cuticle Pusher
100 Orange Sticks
5 Crystal Files
Hair dryer
Consultant Guide
3 Buffers
3 Sets of Scissors
50 Sample cards/Business Cards
1 Sheet of Nails in the Kit
Credit to order 3 sheets of nails of your choosing.
3 months of use on your personal website.

You can learn more about this ground level company here! I would be so happy for you to become part of my team and join me on this journey!

Monday, August 6, 2012

Be a Hostess, Earn Rewards!


You'll love our products!
If you haven't tried Jamberry Nail Shields then the in-home party is the best way to experience the product! Hosting a party is not only simple and fun, but a great way for you to earn free Jamberry Nail shields an spend some time with friends! At a party you and your guests will be able to learn the application process and try it for yourselves! But an in-home party isn't the only way to can earn rewards! You can also host catalog or online parties with ease!


How it works
1. Schedule a Jamberry Party! If you don't already know a consultant, please click on the link and I will be happy to work with you.

2. You and I will collaborate together in planning and preparing for a great party that fits your needs and works with your schedule.

3. Earn Hostess Rewards from your party!

It's as easy as that!

As a Hostess, you'll receive amazing rewards just for bringing a group of friends and family together to share a fun night together experiencing an amazing product

Guest Sales Hostess Rewards
$75.00 or more in sales Your choice of 1 FREE sheet of nail shields!
$150.00 - $249.00 in sales 10% of your total sales towards your choice of Jamberry products and 1 item at half off!
$250.00 - $399.00 in sales 10% of your total sales towards your choice of Jamberry products and 2 items at half off!
$400.00 - $999.00 in sales 15% of your total sales towards your choice of Jamberry products and 3 items at half off!

After your party, the rewards keep rolling in!
When a guest from your party books and hosts a Jamberry Nails Party of their own within the next 3 months, you may order any one item from our catalog at half price and the sale will count towards their party total! (Party sales must be $150.00 or more for Past Hostess Booking Benefit to be activated.)

I am proud to say that I feel Jamberry honestly has one of the most generous hostess rewards programs I have seen in Direct Sales! For example, my very first hostess had a party with total sales  of $342.50. This means she earned 1 FREE sheet of nail shields of her choice, an additional $34.25 to spend in the Jamberry catalog on items of her choice, and 2 half priced items of her choice! How awesome is that!?!

Schedule your party now and you can be the next  hostess to earn awesome rewards just for having a night out with the ladies or hostessing a little girls birthday party!